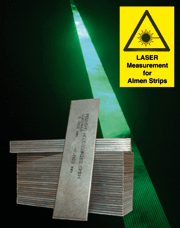
For any shot peening facility, the Peening (Almen) intensity is, besides the coverage, the most important peening parameter. Peening (Almen) strips are used to determine or to re-confirm the peening intensity. Therefore it is not surprising that the demand for high quality Peening (Almen) strips is ever increasing.
Specifications for Peening (Almen) Strips
There are a large number of specifications which define the material, hardness, dimensions, finish and manufacturing means for Peening (Almen) strips. The most widely used specifications are the SAE J442 (Surface Vehicle Standard), the SAE AMS-S-13165C and the SAE AMS-2432 (Aerospace Material Specifications).
One of the key parameters for Peening (Almen) strips is their flatness. This is for good reason. After the peening of a strip, an Peening (Almen) gage, which often has a resolution of 1 micron, is used to measure the arc height of the strip. Naturally, measuring with such an accuracy, the pre-bow of the strips will influence the reading to a large extent. Therefore the flatness of the strip is of crucial importance. The 3 most widely used specifications for Peening (Almen) strips have the following flatness tolerances:
SAE J442
+/- 0.025 mm flatness
AMS-S-13165C
+/- 0.038 mm flatness
SAE AMS 2432
+/- 0.0125 mm flatness
There are also plenty of so called manufacturer specifications. Basically all large aircraft or aero engine manufacturers have their own. But besides the normally very strict aviation industry specifications, manufacturers in the automotive industry, spring industry, etc., have shot peening related specifications.
There is a clear tendency that the requirements in the specifications get more and more stringent. The German company Peening Accessories (PA) is well aware of this development and took the quality control of their strips to a new level.
Quality Control for Peening (Almen) Strips
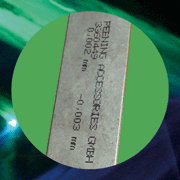
From each lot of newly manufactured strips, samples are taken and checked in terms of hardness, finish and mechanical dimensions. However, only for Peening Accessories best quality, the AERO strip, the flatness was measured manually for each single strip. This was, like any manual process, not completely free of mistakes. Therefore, starting from 2005, each and every strip, regardless of its type, will be laser measured. That is a 100% quality control in terms of the critical flatness. In addition, the flatness reading will be printed on the strip.
Description of the Peening (Almen) Strip Laser Measurement Process
The laser measurement of the strips is completely independent from the production of the strips. So it would be possible to limit this high degree of quality control to a premium quality Peening (Almen) strip only. However, Peening Accessories made the decision to use this technology for all its strips.
The already finished and corrosion protected strips will be charged into a vibrating bowl, which feeds the strips, one by one, to a small conveyer belt. The belt has just the width of a strip. Reaching a certain point of the conveying system, tiny air cylinders will press the strip with a defined pressure onto the measurement block. This is very important since the high measurement accuracy depends on an absolutely uniform measurement condition.
A laser sensor will first measure out the upper surface. Since both sides of the strip will be measured, a small robot grip will take the strip and turn it around for the second reading. Both flatness values will be printed onto the strip side, which has the reading with the larger value. So depending on the reading, the robot will rotate the strip again to prepare it for the printing. Those strips, which do not fulfil any of PA's tolerances, are rejected from the very beginning. All others will be transported to the printing device. The ink used for such a purpose is supposed to fulfil special requirements. This ink must be able to adhere to a metal material and, in order to avoid a smearing, dry out at once. Furthermore it has to be resistant to oil and to wear of friction. After several tests, the right ink was found.
A distribution and selection system for the strips has been integrated in the measuring process. According the final results of the reading, the conveyer belt will transport the strips to a number of collection buckets which will receive the particular strips. Finally the laser measured strips are ready for packing.
Conclusion
Using such laser measured and marked Peening (Almen) strips, the customer is able to visually identify immediately that each strip has been manufactured according to the required flatness tolerance. Therefore there is no need to measure the strip before usage, which also saves time. Since the strip will be peened on the side which has no print, the reading remains on the strip even after the treatment. Peening Accessories is convinced that it has again taken a step in the right direction to increase the quality control of the peening process.
| Peening Accessories GmbH Tel. +41.44.8312644 (Switzerland) E-mail: info@peening.ch, www.peening.ch |


